
A large, full-length mirror is one of the most transformative additions you can make to a room. At around 170 x 80 cm, a heavy mirror of this size will reflect light, create the illusion of space, and add a genuine focal point — but only if it’s hung safely and securely. This guide walks you through exactly how to hang a large mirror on a plasterboard or drywall wall, using our heavy-duty two-part interlocking mirror fixings designed specifically for this job.
Safety first. A mirror of this size and weight is heavy — easily 15–25 kg depending on the frame. Never attempt to lift or hang it alone. Always have a second person with you.
Part of our How to Hang a Mirror guide series:
- You are here: How to Hang a Heavy Mirror on Plasterboard (Drywall)
- How to Hang a Heavy Mirror on a Solid Wall (coming soon)
- How to Hang a Heavy Mirror — Complete Overview (coming soon)
What You’ll Need
Before you begin, gather everything in one place. Having all tools to hand before you start will make the job far smoother.
- Mirror fixings — the heavy-duty two-part interlocking brackets that are available to purchase on our site (wall plate + frame plate, screws included)
- Plasterboard wall fixings (hollow wall anchors) and matching screws — use a reputable brand rated for the weight of your mirror
- Electric drill
- Drill bits: 8 mm or 7 mm for plasterboard fixing holes; 4 mm and 2 mm for pilot holes into the plasterboard or wooden wall stud; 1.5 mm if pre-drilling into a wooden mirror frame
- Crosshead screwdriver (or crosshead bit for your drill)
- Spirit level
- Measuring tape
- Pencil
- Wall scanner / stud finder — optional but strongly recommended

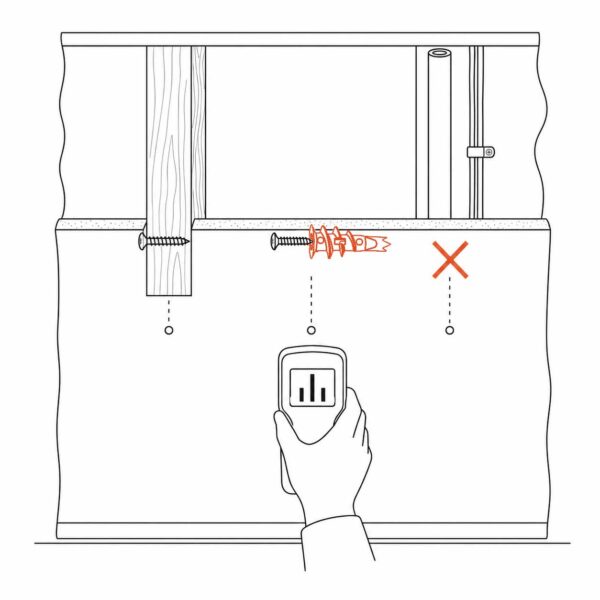
A Note on Your Wall
This guide focuses on plasterboard walls (also called drywall) — the most common interior wall type in modern UK homes. Plasterboard is fixed to a framework of timber or metal studs behind it, and this matters for how you drill and fix.
- If your stud finder locates a timber stud behind the plasterboard at or near your intended fixing point, screw directly into it — no wall plug needed, and the hold will be even stronger.
- If no stud is present, use quality hollow wall anchors (plasterboard fixings). These grip the back face of the board and can comfortably hold the weight of a large, heavy mirror when used correctly.
- If your stud finder detects metal at a position, do not drill there — it is likely a pipe or cable. Move your fixing point slightly and re-check.
Got a solid or brick wall instead? This guide covers plasterboard and drywall only. See our How to Hang a Heavy Mirror on a Solid Wall guide (coming soon) for brick, concrete, and stone walls.
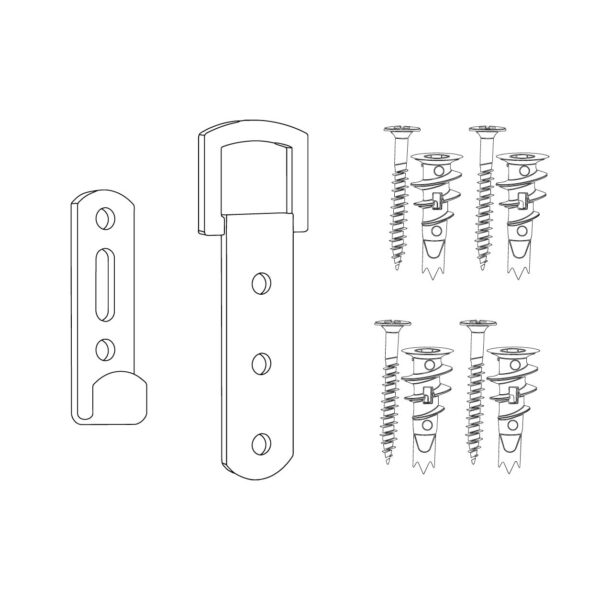
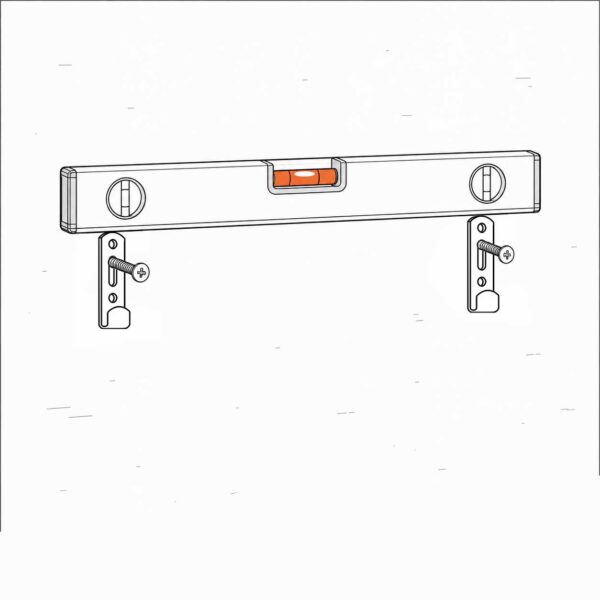
Understanding the Fixings
Our mirror fittings come with a two-part interlocking bracket system — the most secure way to attach a heavy mirror to a plasterboard wall. Each set consists of:
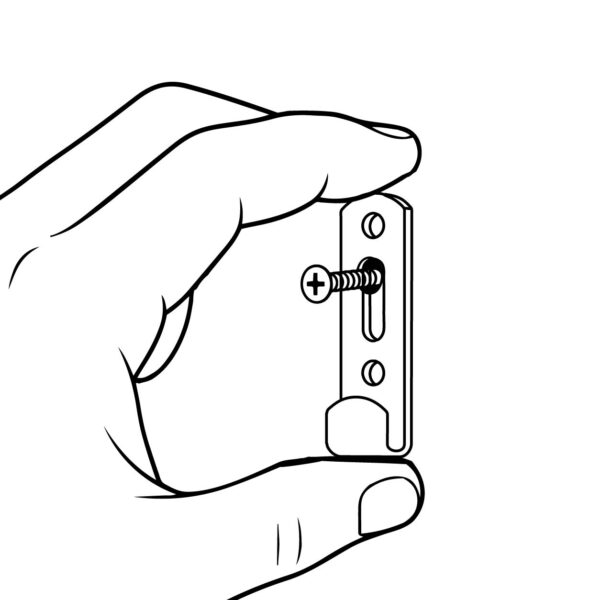
- Wall plate — a short, narrow bracket with an oval adjustment slot and two fixing holes. This screws to the wall. A small protruding lip at the bottom of the plate acts as the hanging point.
- Frame plate — a longer bracket with an arched cutout at the top and two or three fixing holes along its length. This screws to the back of the mirror frame. The arched cutout hooks over the wall plate lip to hang the mirror.
Two complete sets are included — one for each side of the mirror. The oval slot on the wall plate allows you to make small up/down adjustments even after the screws are partially in, giving you fine control over the final height.
Step-by-Step Instructions
Step 1 — Clear the space
Move any furniture, rugs, or objects away from the wall and the surrounding floor area. You need clear, safe working room to manoeuvre a large, heavy mirror. Lay a folded blanket or rug on the floor near where you’ll be working — this protects the mirror face if it rests on the ground at any point.

Step 2 — Lean the mirror with its back facing you
Stand the mirror with its back face outward, leaning gently against a wall or piece of furniture. This gives you easy, comfortable access to the back of the frame for measuring and attaching the brackets. Make sure it’s stable and won’t slide.

Step 3 — Find the fixing positions on the frame
The frame plates need to be positioned symmetrically on the back of the mirror, set in from each side and down from the top. Use the following method:
1. Measure the total height of the frame (for a 170 cm mirror, this is 170 cm).
2. Calculate 12.5% of that height — for a 170 cm mirror, this gives you approximately 21 cm.

Measure 21 cm down from the top edge of the frame and make a light pencil mark.
Now measure 3 cm in from one vertical edge of the frame at that height, and make a second pencil mark. This is where the centre of your first frame plate will sit.

Repeat on the opposite side of the frame — same distance down from the top, same distance in from the edge. Both marks should be perfectly symmetrical.
These positions give the brackets the best mechanical advantage — high enough to keep the mirror stable against the wall, but with enough frame below to prevent any forward tilt so that the mirror sits as flush to the wall as possible.
Step 4 — Attach the frame plates to the mirror
Take the two frame plates (the longer brackets).
1. Hold a frame plate against the back of the mirror, centred on one of your pencil marks, with the arched cutout facing upward.
2. If the frame is wooden, use a 1.5 mm drill bit to make shallow pilot holes through the bracket’s fixing holes into the wood — this prevents the frame from splitting.

3. Screw the frame plate firmly to the back of the frame using the provided screws. It should sit flush and feel solid with no wobble.
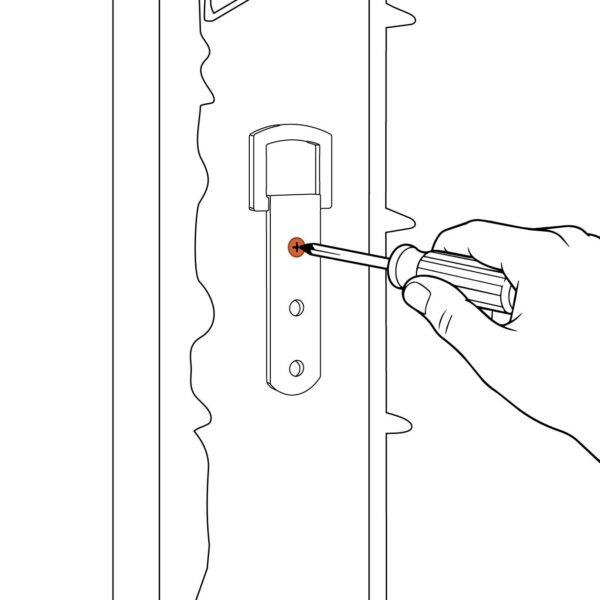
4. Repeat on the other side.

Step 5 — Scan the wall
Before you mark or drill anything on the plasterboard, run your wall scanner across the area where the mirror will hang. Follow the manufacturer’s instructions for your model — most require you to sweep slowly in a horizontal line.

- Mark any wooden studs you find with a light pencil mark at the top of the skirting or just outside the mirror’s intended area.
- Note any metal signals — these could be pipes or cables. Do not drill into these zones.
- If a stud falls usefully close to one of your intended fixing points, plan to use it. Even one fixing into a stud is a significant strength advantage when hanging a heavy mirror on drywall.

Step 6 — Determine the hanging height
This is easiest with two people. Have your helper hold the mirror face-forward against the wall at the approximate height you’d like it to hang.

Stand back and assess:
- Is the top of the mirror at a comfortable height, or too high/low?
- Does it feel centred on the wall, or in the right position relative to furniture nearby?
- For a full-length mirror in a bedroom or hallway, the bottom edge is typically around 10–15 cm from the floor.
Once you’re happy with the position, look at the back of the frame through the gap at the side and note where one of the frame plate brackets sits against the wall. Ask your helper to hold the mirror perfectly still.

Step 7 — Mark the first wall hole
With the mirror held in position:
- Use a pencil to mark the wall at the top of the oval slot on the wall plate position — or, more precisely, mark the wall through the two fixing holes of the wall plate if you can reach them.

If it’s easier, use this alternative method: note the height of the frame plate bracket’s arched cutout on the wall, mark it, then set the mirror down and transfer this to the correct position for the wall plate lip (the wall plate lip sits slightly below the arched cutout when hanging, so factor in the interlocking offset — typically 1–2 cm depending on your specific bracket).
Make a clear pencil cross on the wall for the first fixing point.
Step 8 — Measure and mark the second wall hole
Now you need the second fixing point to be at exactly the same horizontal distance apart as the two frame plates on the back of the mirror, and at exactly the same height.
1. Measure the horizontal distance between the two frame plates on the back of the mirror (centre to centre).

2. From your first pencil mark on the wall, use your spirit level to draw a faint horizontal line across to where the second mark should be.

3. Measure along that line the exact distance you noted in step 1, and make a second pencil cross.

Both crosses on the wall should now mirror the spacing of the brackets on the back of the frame. Double-check with the spirit level across both marks before drilling.

Step 9 — Drill and fix the wall holes
With your marks confirmed, it’s time to drill into the plasterboard.
If fixing into a timber stud:
- Use a 1.5 mm or 2 mm drill bit depending on the thickness of the screw shank (the solid middle part of the screw, not counting the threads), and drill a clean pilot hole to a depth of around 40 mm (or the length of your screw). No wall plug is needed — the screw will bite directly into the timber.

If fixing into plasterboard only (no stud):
1. Use a 4 mm drill bit to make a pilot hole for the larger drill bit. Drill cleanly and horizontally, perpendicular to the wall.
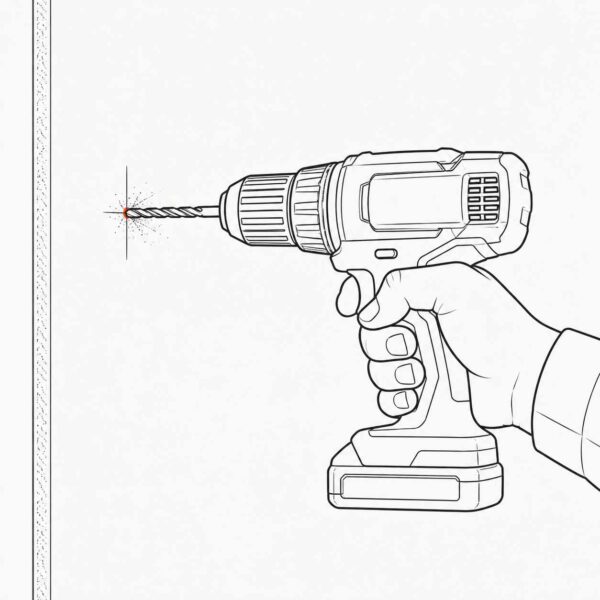
2. Then use a 7 mm or 8 mm drill bit (or the size specified by your plasterboard fixing brand). Do not force the drill or widen the hole — a snug fit for the wall plug is essential.

3. (Optional but recommended) hold the tail-end of each plasterboard fixing with a pair of pliers, and drill its screw in and out of the fixing a few times. This will allow the screw to be easily inserted into the fixing (after the fixing has been screwed into the wall) without damaging and weakening the plasterboard fix.

4. Insert your hollow wall anchor into the hole by screwing it in gently. It should be a firm screw-in-fit, with the collar sitting flush with the wall surface.

Repeat for both fixing points.
Step 10 — Attach the wall plates
Take the two wall plates (the smaller, shorter brackets).
1. Hold a wall plate over the first fixing point, lip facing downward, with the oval slot aligned over the fixing hole.
2. Insert the screw but don’t fully tighten it yet — leave it slightly loose so the plate can still slide within the oval slot.
3. Repeat for the second wall plate.
4. Place your spirit level across both wall plates and adjust their vertical position using the oval slots until they are perfectly level with one another.
Once level, tighten both screws fully.
Step 11 — Hang the mirror
With both wall plates secure and level, you’re ready to mount the mirror.
1. With your helper, lift the mirror by the frame — never the glass.
2. Bring it to the wall and angle the top slightly forward.

3. Slot the arched cutouts of the frame plates over the lips of the wall plates — one side at a time if needed. If it’s difficult to get the cutouts over the lips, you can gently bend the cutouts out from the frame a bit to make this easier.

4. Once both brackets are engaged, gently lower the mirror flat against the wall. You should feel and hear it settle into place.
Step 12 — Final level check and adjustments
Step back and check the mirror visually. Then place your spirit level along the top edge of the frame.

- If the mirror needs a very slight tilt correction, you can partially loosen one wall plate screw and shift the plate up or down within the oval slot, then re-tighten. The two-part system makes this easy without removing the mirror.
- Once you’re satisfied, the heavy mirror is safely secured to the wall.

Aftercare and Maintenance
Your mirror is now safely attached to the wall. A few simple habits will keep it that way:
- Check the fixings every few months. Give each wall plate a gentle test to confirm the screws haven’t worked loose over time — especially important for a heavy mirror.
- Avoid sharp knocks to the glass. Even well-hung mirrors can crack from impact — be mindful of items nearby, especially in hallways.
- Keep the glass away from heat and cold. Rapid temperature changes can stress the glass. Avoid positioning the mirror directly above a radiator if possible.
- Clean with a soft, slightly damp cloth. Wipe gently in circular motions. Avoid harsh chemicals or abrasive cloths that can damage the mirror coating or frame finish.

Frequently Asked Questions
Do I need to find a stud to hang a heavy mirror on plasterboard? Not necessarily. Modern hollow wall anchors are engineered specifically for plasterboard and drywall, and are more than capable of supporting a large, heavy mirror when used correctly. That said, if a stud is conveniently located, using it adds extra peace of mind — especially for a mirror this size and weight.
How do I hang a heavy mirror on plasterboard without studs? Use high-quality hollow wall anchors (sometimes called plasterboard fixings or drywall anchors) rated for the weight of your mirror. These expand behind the board as the screw is tightened, gripping the back face of the plasterboard securely. Always check the weight rating on the packaging and use two fixing points — one on each side of the mirror — for a balanced, stable hang.
What if my wall sounds hollow in one spot and solid in another? That’s completely normal with stud-framed plasterboard walls — the solid areas are the timber uprights (studs), and the hollow areas are the unsupported board between them. Use a stud finder to map them accurately before you decide on your fixing positions.
Can I hang this mirror solo? We strongly advise against it. A 170 x 80 cm mirror can weigh 15–25 kg. Attempting to hold it in position while marking the wall, or to lift it onto the brackets alone, is both difficult and risky. Always have a second pair of hands.
My wall plates aren’t sitting level after tightening — what do I do? Use the oval slot adjustment. Loosen the screw by half a turn, shift the plate to the correct position, and re-tighten. If one side is significantly higher than the other, it likely means the wall marks were not at the same height — measure again from a fixed reference point (such as the floor or skirting board) to reset.
Is this guide suitable for a solid brick or concrete wall? No — brick, stone, and solid concrete walls require different drill bits, fixings, and technique. See our How to Hang a Heavy Mirror on a Solid Wall guide (coming soon) for full instructions.
Looking for a more general overview? Our How to Hang a Heavy Mirror — Complete Guide covers all wall types and helps you work out which approach is right for your home (coming soon).
Always check the weight rating of your plasterboard fixings before use and ensure they are appropriate for the total weight of your mirror.